Setting up server racks, network cabinets, or other equipment enclosures often requires a solid understanding of hardware mounting. One of the most common components used in these setups is the cage nut. These small, yet highly useful pieces allow you to securely attach devices to a rack without damaging it, making them a key part of any IT or electronics setup. While the idea of installing them might seem tricky at first, the process is actually straightforward once you know the steps and have the right tools on hand.
Cage nuts are widely used because they offer both flexibility and stability. They let you mount equipment in racks without having to drill or modify the metal, and they can be repositioned or replaced as needed. In this guide, we’ll walk you through everything you need to know—from the tools required and safety measures to a step-by-step installation process. By the end, even someone with no prior experience will be able to install these nuts correctly and efficiently.
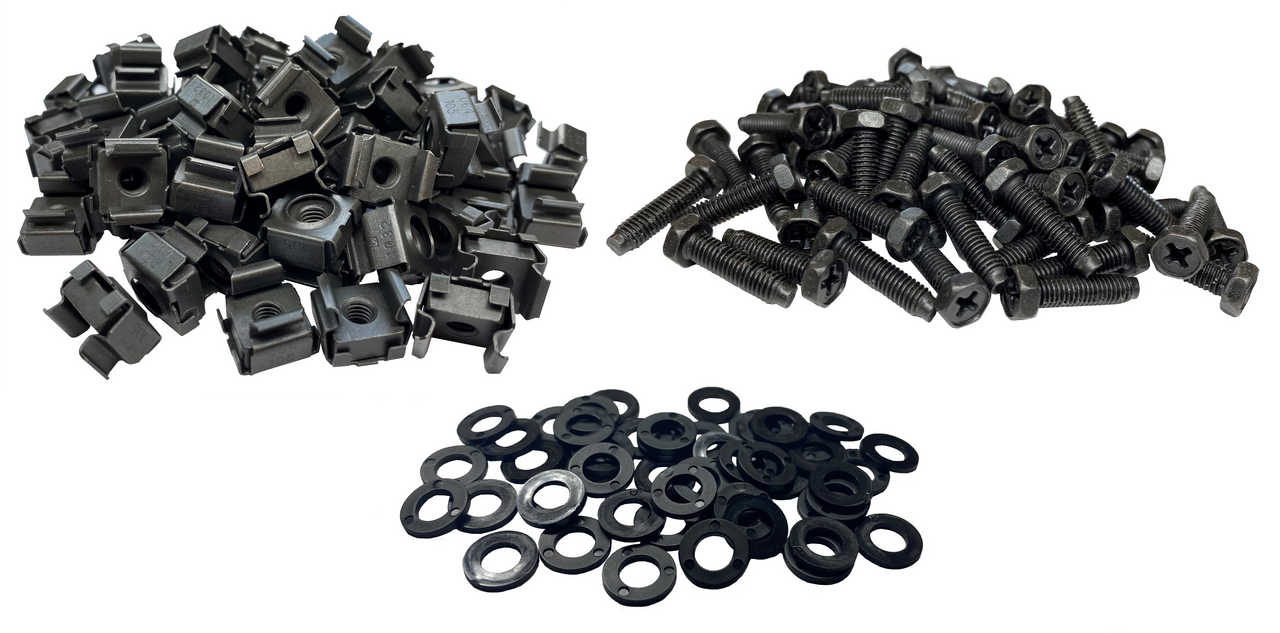
What Are Cage Nuts and Why Are They Important?
Before jumping into installation, it’s helpful to understand what these nuts are and why they’re so commonly used. Cage nuts consist of a square-shaped nut encased in a spring steel cage. The cage allows the nut to clip into the square holes that are standard in most 19-inch racks. Once installed, the nut provides a stable threaded point for screws, allowing you to mount equipment securely.
One of the main advantages of using cage nuts is that they protect the rack from damage. Racks are often made from thin metal that cannot be threaded directly. Without cage nuts, screws could strip the metal or create uneven mounting points. Additionally, cage nuts are strong enough to support heavy equipment like servers and switches, making them reliable for long-term use.
Tools You Will Need
Having the right tools makes installation much easier and safer. Here’s a list of items you should have ready:
- Cage Nut Tool or Pliers – A special tool designed for cage nuts will make installation quicker and easier. Needle-nose pliers can work if you don’t have the tool, but they require more care.
- Gloves – Rack edges can be sharp, so gloves will protect your hands from cuts.
- Screwdriver – You’ll need this to mount your equipment after the nuts are in place.
- Cage Nuts – Make sure the size matches your rack’s square holes.
- Screws – Check that the screws are compatible with both the cage nuts and your equipment.
Preparing everything in advance helps avoid frustration during installation.
Step 1: Choose the Right Spot
Start by deciding where each piece of equipment will go in your rack. Most racks use a standard “U-space” system, which makes it easy to measure and align hardware. Mark the spots where you will insert cage nuts.
Double-check that there’s enough space for airflow and cabling. Poor placement can block airflow, create strain on cables, or make it harder to install or remove equipment later. Taking a few minutes to plan the layout will save you headaches down the line.
Step 2: Prepare the Cage Nuts and Rack
Inspect the cage nuts and rack holes before installation. Look for any bent or damaged holes in the rack that might make installation difficult. Ensure the cage nuts are the right size and type for your rack.
Some cage nuts have wings that make them easier to snap in, while others may require slight compression. Knowing your type of nut will make the process smoother and reduce the chance of damaging the rack or the nut.
Step 3: Insert the Cage Nuts
There are two main ways to insert cage nuts:
- Using a Cage Nut Tool: Place the tool around the nut, align it with the square hole, and gently press it in until it snaps into place.
- Using Pliers: Grip the nut with needle-nose pliers, slightly compress the wings, position it over the hole, and release carefully so the cage clips securely behind the rack.
Apply steady, controlled pressure. Forcing the nut in can bend the cage or damage the rack. A soft “click” usually signals that the nut is securely in place.
Step 4: Check the Nut
Once installed, make sure the cage nut is seated correctly. It should sit flush against the rack with no gaps or uneven edges. Lightly wiggle it to confirm that it doesn’t move.
It’s also a good idea to test with a screw before mounting any equipment. Insert the screw and turn it a little to make sure it threads smoothly. This avoids surprises when you’re ready to attach heavy hardware.
Step 5: Mount Your Equipment
With the cage nuts in place, you can now attach your server, switch, or other equipment. Line up the device’s mounting holes with the cage nuts, insert the screws, and tighten them gradually. Avoid overtightening, as this could strip the threads or damage the rack.
For heavier equipment, consider asking someone to help hold the device in place while you secure it. Proper alignment ensures the equipment is stable and helps prevent unnecessary stress on the nuts or screws.
Step 6: Repeat the Process
Most devices require multiple cage nuts for secure mounting. Repeat the steps for each nut, making sure each one is aligned and fully seated. Taking your time will prevent misalignment and ensure that your equipment is mounted safely.
Helpful Tips for a Smooth Installation
- Plan Ahead: Measure your equipment and rack units before starting.
- Use the Right Tool: A cage nut installation tool reduces finger strain and speeds up the process.
- Protect Your Hands: Gloves protect against sharp edges.
- Check Alignment: Make sure each nut is straight and fully seated before moving on.
- Don’t Over-tighten Screws: Screws should be snug but not forced.
Following these tips will make the process safer, faster, and more reliable.
Common Mistakes to Avoid
Even though installing cage nuts is simple, beginners often make mistakes:
- Forcing the Nut: This can bend the cage or damage the rack.
- Skipping Inspection: Check the rack holes and nuts for defects to avoid issues.
- Over-tightening Screws: Can strip threads and ruin the nut.
- Incorrect Placement: Improper spacing can reduce stability and airflow.
Being aware of these mistakes can save time and prevent damage.
Removing and Reusing Cage Nuts
Cage nuts can be reused, which is helpful if you frequently rearrange your rack. To remove one, use a cage nut tool or needle-nose pliers to compress the wings and pull it out carefully. Check the nut for any bending before reusing it. Regularly inspecting your mounted equipment and nuts ensures everything remains secure over time.
Conclusion
Installing cage nuts is a simple but essential skill for anyone working with racks and mounted equipment. With the right tools, preparation, and careful technique, the process is quick, safe, and repeatable. By following this step-by-step guide—planning the layout, properly inserting the nuts, checking alignment, and securely mounting equipment—you can ensure a strong, professional installation.
These small components play a big role in keeping your rack organized and equipment secure. Learning to install them correctly saves time, prevents damage, and allows your hardware to remain stable and functional for years. Whether you’re setting up a new rack or updating an existing one, mastering this skill is a must for any IT or technical workspace.
What Is Section 125 Deduction And How Does It Reduce Taxes?
KBC Head Office Kolkata: Complete Guide to Contact Details, Registration Process,
Slide Gate Opener: The Smart Way to Secure and Automate Your Entrance
Is PRP Hair Treatment Effective for Early Hair Loss?
Sustainable Industrial Wastewater Treatment Solutions in Malaysia