


Understanding how to install LVP over concrete correctly is what separates a floor that looks great for 20 years from one that buckles or develops mold problems within a few seasons. Concrete is one of the most common subfloor surfaces in basements, ground-floor rooms, and slab-foundation homes. It is also the most demanding subfloor type for any flooring installation because of one constant challenge: moisture. Getting your underlayment right and preparing the concrete properly before a single plank goes down is what makes the entire project succeed or fail. This guide walks through every step of the process so your luxury vinyl plank over concrete installation is done correctly from the very beginning.
Why Concrete Is a Unique Challenge for LVP Installation
Concrete looks solid and inert but it is actually a porous material that draws moisture vapor up from the ground continuously. Even a concrete slab that feels completely dry to the touch can emit significant levels of moisture vapor over time. That vapor has to go somewhere and if it cannot escape upward through the flooring, it gets trapped between the slab and the underlayment. Over time that trapped moisture causes the underlayment to degrade, encourages mold growth, and creates conditions that cause even waterproof LVP planks to lift, cup, or separate at the seams.
This is the core reason why the underlayment step is so critical in any luxury vinyl plank over concrete installation. Choosing the wrong underlayment or installing it poorly defeats the purpose of using a waterproof flooring product in the first place.
The good news is that LVP is genuinely one of the best flooring materials for concrete subfloors. Its waterproof core handles the demands of below-grade and ground-level installations better than almost any other category of flooring. When the preparation and underlayment steps are handled correctly, installing vinyl plank flooring on concrete produces a durable, comfortable, and attractive result in virtually any room of the home.
Tools and Materials You Will Need
Before starting any installation gather everything you need so the process runs without interruption. Having all materials on hand also prevents the common mistake of rushing steps because you need to make another trip to the store.
For a standard LVP flooring installation over concrete you will need:
- Luxury vinyl plank flooring with enough square footage plus 10% overage for cuts and waste
- Underlayment appropriate for concrete subfloors with an integrated moisture barrier
- Moisture testing kit or digital moisture meter
- Self-leveling compound and mixing tools
- Concrete grinder or floor sander for high spots
- Tape measure and chalk line
- Utility knife and straight edge
- Pull bar and tapping block
- Rubber mallet
- Spacers for expansion gaps
- Moisture-resistant tape for underlayment seams
- Safety gear including knee pads, gloves, and eye protection
Browse the full range of installation materials available at Flooring Outlet & More to ensure you have the right products for your specific installation.
Step 1: Test the Concrete for Moisture Before Anything Else
Moisture testing is the single most important step in any LVP flooring installation over concrete and the one most commonly skipped. Never assume a concrete slab is dry enough to install over without testing. Even slabs that have been in place for decades can emit moisture levels that are problematic for underlayment performance.
There are two reliable methods for testing concrete moisture.
Calcium Chloride Test
This test measures moisture vapor emission rate (MVER) from the concrete surface. You place sealed test dishes containing dry calcium chloride crystals on the concrete for 60 to 72 hours then measure the weight gain. Results are expressed in pounds of moisture per 1,000 square feet per 24 hours. Most LVP manufacturers accept readings of 5 lbs or below for floating installations.
Relative Humidity Probe Test
This is currently the more accurate industry standard test. Probes are inserted into drilled holes in the concrete and measure the relative humidity within the slab itself rather than just at the surface. A reading of 80% relative humidity or below is generally acceptable for most LVP installations. Check your specific product’s manufacturer guidelines as acceptable thresholds vary.
If moisture readings come back above the acceptable range do not proceed with installation. Address the moisture source first, whether that means improving exterior drainage, sealing the slab with an epoxy moisture barrier, or installing a sump pump in basements with water intrusion. Installing over a wet slab even with a moisture barrier underlayment is a risk that frequently leads to costly failures.
For more guidance on protecting floors from water damage at every stage see How to Prevent Water Damage on Your Floors.
Step 2: Clean and Inspect the Concrete Surface
Once your moisture test results are acceptable the next step is a thorough inspection and cleaning of the slab. Any contaminants on the concrete surface will interfere with underlayment performance and affect how the floor feels once it is installed.
Start by sweeping and vacuuming the entire slab to remove all dust and loose debris. Look carefully for:
- Old adhesive or glue residue from previous flooring
- Paint, sealers, or other coatings
- Oil stains or chemical spills
- Cracks, chips, or damaged areas
- High spots and low spots
Adhesive residue and paint should be scraped or ground off. Old adhesive that is fully bonded and flat does not necessarily need full removal but any adhesive that creates ridges or bumps must be addressed. High spots can be ground down with a concrete grinder. Low spots and cracks should be filled with a patching compound and allowed to cure fully before proceeding.
Step 3: Level the Concrete Subfloor
A flat subfloor is essential for a successful install of vinyl plank flooring on concrete projects. LVP is more forgiving of minor irregularities than laminate but significant dips, bumps, or ridges will still cause problems. Planks that span across an uneven surface are stressed at their locking joints. Over time that stress leads to cracking or separation at the seams.
The general standard for LVP installation is a floor that is flat within 3/16 of an inch over a 10-foot span or 1/8 of an inch over a 6-foot span. Use a long straightedge or level to identify problem areas across the full surface of the room.
For low spots use a self-leveling compound. Mix it according to manufacturer instructions and pour it into the depressed area allowing it to flow and self-level naturally. Most compounds are walkable within a few hours and ready for flooring installation within 24 hours. For high spots use a concrete grinder to bring the surface down.
This step takes time but it is not one to rush. A properly leveled subfloor is the foundation of everything that follows.
Step 4: Choose and Install the Right Underlayment
This is where many DIY installations go wrong. The underlayment for luxury vinyl plank over concrete must do two jobs simultaneously. It needs to provide cushioning and sound dampening while also acting as an effective vapor barrier against concrete moisture. Not all underlayment products do both well.
What to Look for in Concrete-Specific Underlayment
For concrete subfloors always choose an underlayment with a built-in moisture barrier rated for below-grade or on-grade installation. Look for products that specify a permeance rating of 0.15 perms or lower. The lower the permeance rating the more effectively the underlayment blocks vapor transmission.
Foam underlayment with an attached polyethylene film is the most common option and works well for most residential installations. Closed-cell foam provides good cushioning and does not absorb moisture. The attached film handles vapor protection.
For basements or rooms with higher moisture readings consider a combination underlayment with a thicker polyethylene film layer or a rubber-based product that provides superior vapor resistance along with excellent sound dampening.
Thickness should stay within the range recommended by your LVP manufacturer, typically between 1mm and 3mm for floating installations. Going thicker than recommended creates too much flex in the floor which stresses the click-lock joints between planks over time.
If your LVP planks already have a pre-attached underlayment pad, check the manufacturer’s instructions before adding a separate layer. In most cases when planks have an attached pad, adding a separate foam underlayment is not recommended. However you may still need a standalone moisture barrier film on the concrete even when the planks have pre-attached padding.
For a full breakdown of underlayment types and how to select the right one see The Best Moisture Barrier for Laminate Flooring as many of the same principles apply to LVP underlayment over concrete.
How to Install the Underlayment Correctly
Roll the underlayment out perpendicular to the direction you plan to run your LVP planks. Butt the edges of each strip together tightly without overlapping the foam layers since overlapping creates ridges that show through the finished floor.
If your underlayment is a film-style moisture barrier, overlap the seams by at least 6 to 8 inches and seal every seam with moisture-resistant tape. Do not leave any gaps in the seam coverage. Run the underlayment up the walls by about 2 to 3 inches on each side. This protects against moisture that can migrate from the base of the walls rather than just from the slab surface. Trim the excess after baseboards are installed.
Smooth the underlayment flat across the entire room before beginning plank installation. Any wrinkles, bubbles, or folded edges create soft spots or ridges under the finished floor.
Step 5: Plan Your Layout Before Installing the First Plank
Good layout planning before you start your LVP flooring installation saves significant time and produces a better visual result. The goal is to avoid very narrow cut pieces along the walls and to ensure the plank pattern is balanced and visually appealing from the room’s main entrance.
Measure the width of the room and divide by the width of your plank. If the remaining cut piece would be less than half a plank wide, shift your starting row so the cut pieces at both walls are larger and more even. Narrow slivers along the wall look unfinished and are also structurally weaker.
Snap a chalk line parallel to your starting wall to keep your first row perfectly straight. Even small deviations in the first row compound into larger misalignments as installation progresses across the room.
Plan to run the planks parallel to the longest wall in the room or parallel to the primary light source from windows. Running planks toward natural light emphasizes the visual length of the planks and tends to look most natural.
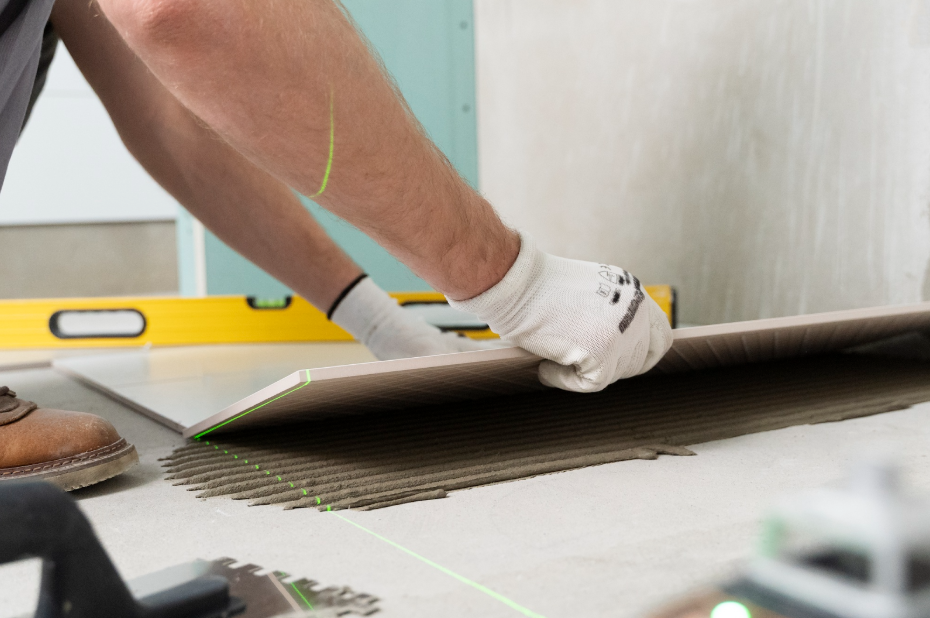
Step 6: Install the LVP Planks
With your underlayment down and your layout planned you are ready to begin the actual plank installation. LVP flooring installation uses a floating method where planks click together and rest on top of the underlayment without being fixed to the subfloor.
Starting the First Row
Place spacers along the starting wall to maintain the expansion gap. LVP needs room to expand and contract with temperature changes. A gap of 1/4 inch around the entire perimeter of the room is standard. Do not skip this step as a floor with no expansion gap will have nowhere to move when temperatures rise and will push against the walls causing buckling.
Lay the first plank with its end against the spacers at the corner. Connect the second plank by angling its short end joint into the first plank and pressing down to lock. Continue along the wall until the row is complete. Cut the final piece of the row to fit leaving the required expansion gap at the end wall.
Continuing Across the Room
Start the second row with the cut-off piece from the end of the first row provided it is at least 6 inches long. This staggers the end joints between rows which is both structurally important and visually necessary. Never align end joints in adjacent rows as this creates a weak point in the floor.
Connect each plank’s long edge to the previous row by angling it into the locking joint and pressing down firmly. Use a tapping block and rubber mallet to close any gaps in the long edge joints. Do not hit the planks directly with the mallet. Always use the tapping block to protect the edge profile.
Check your alignment every three to four rows with your chalk line to make sure the installation is staying straight. Slight deviations in early rows become very obvious by the time you reach the opposite wall.
Working Around Obstacles
For door frames, vents, pipes, or other fixed obstacles measure and mark the cut on the plank carefully before cutting. A jigsaw handles curved and irregular cuts cleanly. A utility knife and straight edge work for straight cuts on most LVP products. Always measure twice before cutting.
For vent covers, remove the cover before installing the floor and cut the plank to size around the vent opening. Reinstall the cover after the floor is complete.
Step 7: Install the Final Row and Finishing Pieces
As you approach the opposite wall the final row of planks will almost certainly need to be ripped down to a narrower width. Measure the remaining space carefully accounting for the expansion gap at the wall. Use a straight edge and utility knife to score and snap the plank to the correct width or cut with a jigsaw for a very clean edge.
Use a pull bar and rubber mallet to seat the final row into the locking joint of the previous row. The pull bar hooks over the edge of the plank and lets you tap the plank into position without damaging the edge or losing the expansion gap at the wall.
Once all planks are installed remove all the spacers around the perimeter. Install quarter-round molding or baseboard to cover the expansion gap. Never nail the baseboard through the floor itself. Nail it to the wall only so it does not restrict the floor’s ability to move freely with temperature and humidity changes.
For doorway transitions between your new LVP and adjacent flooring in other rooms, install the appropriate transition strip. T-molding works between two floors at the same height. A reducer strip handles the transition when one floor sits higher than the other.
Post-Installation Care
Once your install vinyl plank flooring on concrete project is complete, give the floor 24 hours before placing furniture back and 48 hours before placing heavy items or appliances. This allows the floor to settle and any remaining off-gassing from the underlayment adhesive to clear.
For ongoing care sweep or vacuum regularly to remove grit and debris. Damp mop with a cleaner designed for luxury vinyl flooring. Avoid steam mops which force moisture into the seams. Place felt pads under all furniture legs and use mats at entry points to trap dirt before it reaches the floor surface.
For a complete maintenance routine see How to Maintain Your Luxury Vinyl Plank Flooring.
Final Thoughts
A successful LVP flooring installation over concrete comes down to preparation. Testing for moisture, leveling the slab, and choosing the right underlayment are the steps that protect your finished floor from the problems that cause most concrete-floor installations to fail. Once those foundations are in place the actual plank installation is straightforward and rewarding. The result is a floor that is durable, waterproof, and comfortable underfoot in any room of your home.
Visit Flooring Outlet & More to explore a wide selection of luxury vinyl flooring and all the installation materials you need to complete your concrete floor project correctly. Our team is ready to help you find the right products for your specific subfloor conditions and room requirements.
Frequently Asked Questions
Q: Do I always need underlayment when installing luxury vinyl plank over concrete?
A: In most cases yes. Concrete emits moisture vapor continuously and underlayment with an integrated moisture barrier protects the floor from below. If your LVP planks already have an attached pad, a standalone moisture barrier film may still be needed over concrete depending on moisture test results.
Q: How do I know if my concrete is dry enough to install vinyl plank flooring on concrete?
A: Use a calcium chloride test or a relative humidity probe test before installation. Most LVP manufacturers accept moisture vapor emission rates of 5 lbs or below and relative humidity readings of 80% or lower. Always check your specific product’s guidelines as acceptable thresholds vary by manufacturer.
Q: What happens if I skip leveling the concrete before my LVP flooring installation?
A: An uneven subfloor puts stress on the click-lock joints between planks. Over time that stress causes joints to crack or separate creating visible gaps and an unstable floor surface. High spots can also telegraph through the planks and create visible bumps in the finished floor that worsen with foot traffic.
Q: Can I install LVP over a concrete basement floor?
A: Yes. LVP is one of the best choices for basement concrete floors because of its waterproof core. The key is proper moisture testing before installation and using an underlayment specifically rated for below-grade applications. Pair this with a waterproof LVP product for the most reliable long-term result in a basement environment.
Q: Why should I leave an expansion gap around the room when installing a luxury vinyl plank?
A: LVP expands slightly when temperatures rise and contracts when they drop. Without a perimeter expansion gap the floor has no room to move and will push against the walls causing buckling or raised seams. A gap of approximately 1/4 inch around the entire room covered by baseboard or quarter-round molding allows the floor to move freely through seasonal temperature changes.