Join a hands-on Acrylic Pour Bear Workshop to create a one-of-a-kind bear figurine using fluid acrylic techniques. This guided session teaches mixing, pouring, and finishing so anyone can leave with a gallery-ready piece.
TL;DR
- Learn acrylic pouring on a bear figurine in about 1.5 hours, with materials provided, clear safety steps, and practical tips for curing, sealing, and display.
- Workshops suit beginners, families, and corporate teams looking for a creative bonding activity.
- Expect simple mixing ratios, a few pouring techniques, and quick troubleshooting to avoid common issues.
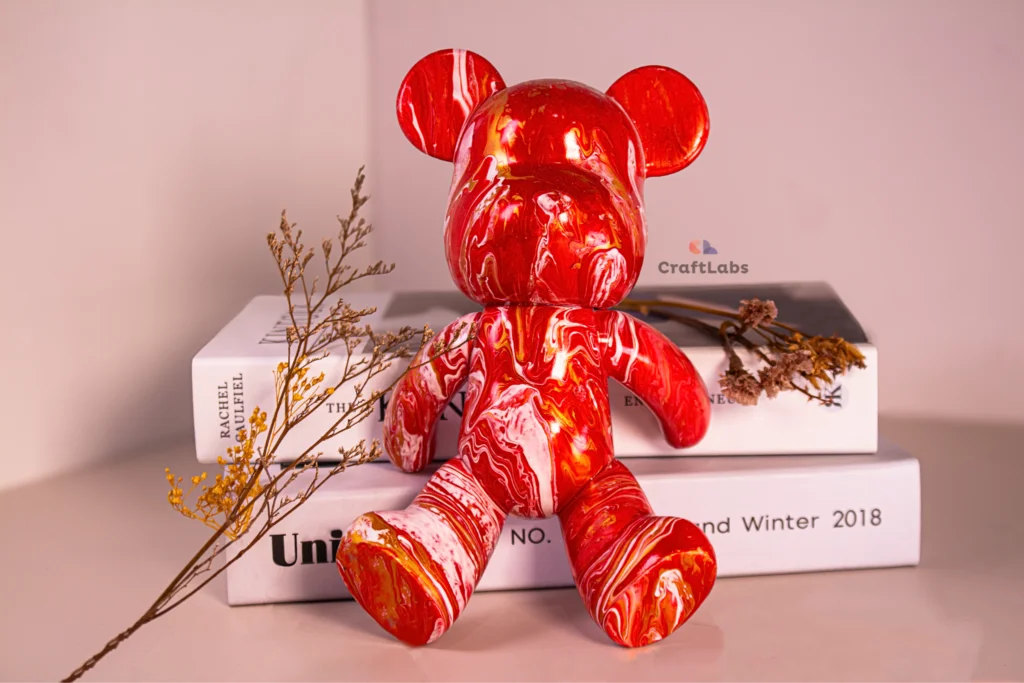
What is an Acrylic Pour Bear Workshop?
This workshop teaches acrylic pouring skills applied to a bear figurine. Participants learn how paint, pouring medium, and movement create abstract patterns. The activity is social and therapeutic, perfect for group bookings and gifts. Epic Workshops runs popular sessions in Singapore that follow this exact format Acrylic Pour Bear Workshop.
Materials list
The session provides all core materials so you only need to show up. Typical items include a bear figurine, acrylic paints, pouring medium, silicone or alcohol for cells, cups, stir sticks, gloves, and disposable covers. *Bring old clothes and closed-toe shoes.* For a full provider breakdown, see the workshop page at Epic Workshops.
Safety considerations
Safety focuses on ventilation, PPE, and safe disposal. Use nitrile gloves, eye protection, and a well-ventilated room when mixing paints and additives. Acrylic paints are water-based, but some additives can irritate skin; the Britannica overview of acrylic paint explains composition and common uses (encyclopedic reference).
Step-by-step plan
Follow a clear plan to finish a bear in one session. Start with surface prep, mix paint and medium, pour using a chosen technique, tilt or torch for effects, and leave to cure. Instructors guide each step, so even beginners complete their piece.
Surface prep
Wipe the bear and add a light primer coat if needed. A clean surface ensures paint adheres evenly and reduces bubbling.
Mixing and pouring
Measure paint, add pouring medium, and mix until fluid. Pour into cups, layer colors, then pour on the bear.
Time estimates
A standard class runs about 1.5 hours and includes setup and a demo. Curing occurs after the workshop, with handling times noted in the curing section. Epic Workshops lists 1.5 hours as a typical duration for this format.
Color palette ideas
Choose palettes to match mood and space. Coastal blues and whites create calm pieces; jewel tones build drama. *Limit to 3–5 colors* to avoid muddy results.
Mixing ratios
Use consistent ratios to predict flow. A common mix is one part acrylic paint to two parts pouring medium by volume. Some paints need slight tweaks; test small amounts first.
Pouring techniques
Different techniques change the final look. Try dirty pours, flip cups, swipe methods, and puddle pours. The Spruce Crafts has practical technique demos that match these methods (technique reference).
Curing times
Drying depends on thickness and humidity. Thin pours can feel dry in 24–48 hours; full cure often takes 7–14 days. Handle pieces carefully until fully cured to avoid fingerprints.
Troubleshooting tips
Common issues include color mudding, bubbles, and uneven pours. Add a touch of silicone for cells, reduce color count to prevent mudding, and pop bubbles with a torch or toothpick. If paint runs off edges, place the bear on a raised rack during curing.
Cleanup steps
Clean tools immediately with water and soap before paint hardens. Dispose of excess paint per local guidelines. Use disposable liners for trays to speed cleanup between participants.
Display and sealing
Seal finished work with a clear resin or varnish for protection and shine. Resin adds depth but requires PPE and careful mixing; varnish gives a quicker, lower-cost finish. Mount bears on a shelf or wooden base for stable display.
Lighting suggestions
Good lighting highlights the pour’s depth and cells. Use warm directional LEDs or spotlights to bring out color contrasts. Place pieces at eye level for the best viewing angle.
Budget estimates
Workshops in Singapore commonly cost S$50–S$90 per person, depending on inclusions and group rates. Buying supplies for DIY sessions runs higher upfront but reduces per-piece cost over time.
Skill level required
No prior experience is required; the workshop is beginner-friendly. Instructors teach core techniques so everyone completes a finished piece.
Next steps
To book a session or check availability, visit the provider page and request a quote. Epic Workshops accepts group bookings and corporate events for team-building sessions (book a workshop).
Summary
An Acrylic Pour Bear Workshop offers a short, guided creative session that suits beginners and groups. You learn safe mixing ratios, a handful of pouring techniques, and practical finishing tips to display durable, vibrant artwork. For local bookings in Singapore, consider Epic Workshops for a streamlined, supplied experience.
FAQ
How long before I can take my bear home?
Pieces are usually stable to transport after 24–48 hours, but full cure can take up to two weeks.
Is this safe for kids?
Yes with supervision; use child-safe paints and ensure PPE and ventilation.
What if my colors turn muddy?
Use fewer colors, check pigment opacity, and avoid overmixing to prevent mudding.
Do I need to bring anything?
Just wear clothes you can get paint on; all core materials are provided by the workshop.
Raspberry Hills | Raspberry Hills Clothing | Get 30% Off
Discover the Best Aesthetic Clinic in Dubai for Fillers and Facial Contouring
The Future of Smart Home Security Systems in 2026
From Rust to Road: How Old Vehicles Find New Purpose Through Reused Parts
How Scrap Yards Give Old Vehicles a Second Purpose in Adelaide